How to Clean a Phone Charging Port: A Practical Guide
Learn safe, effective methods to clean your phone's charging port. This step-by-step guide covers tools, techniques, safety tips, and when to seek professional help to avoid damage.

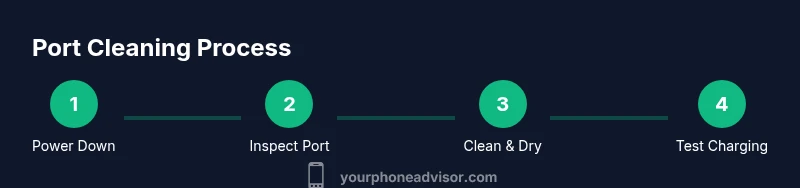
You can safely clean a dirty phone charging port by following a few careful steps: power down, inspect for debris, remove lint with a non-metal tool, use gentle airflow or a soft brush, and test charging before reconnecting accessories. This guide provides a safe, effective approach and highlights when to seek professional help.
Safety first: why cleaning matters
Keeping the charging port clean helps maintain reliable power delivery and reduces the risk of corrosion or moisture-related damage. When you know how to clean phone charging port properly, you minimize the chances of intermittent charging, misalignment, or short circuits caused by trapped debris. According to Your Phone Advisor, a small amount of lint or dust can create a poor connection or trap moisture. This article walks you through safe, practical steps, the right tools, and best practices to protect your device while you maintain its charging performance.
Debris you’ll encounter and how it forms
Charging ports collect debris from daily use, especially if you carry your phone in pockets or bags with lint and fibers. Dust and pocket lint are the most common culprits, but moisture from humidity or sweat can also travel into the port if your device is stored damp or exposed to liquids. Over time, debris can thicken and harden, making the port feel loose or causing charging to stall. Understanding what you’re dealing with helps you choose the right cleaning approach and avoid applying inappropriate pressure or liquids.
Tools and materials you’ll need
Before you begin, assemble a small, safe toolkit:
- A plastic or wooden toothpick (non-metal, explicitly avoid metal) for gentle debris displacement.
- A nylon brush with soft bristles to loosen lint without scratching.
- A compact flashlight or phone flashlight to illuminate the port and spot hidden particles.
- A soft microfiber cloth for wiping the exterior and gently drying the port.
- Optional: compressed air for short bursts and isopropyl alcohol 70% (only if you are comfortable and the port is completely dry afterward). Having the right tools reduces risk and makes the process smoother.
Step-by-step overview (high level)
This section provides the overall flow. You’ll start by powering down the device and unplugging any cables, then visually inspect the port, remove visible debris with a non-metal tool, clean the inner area with airflow or a brush, allow any moisture to dry, and finally test charging. The goal is to clear the port without forcing debris deeper into the device or damaging contacts. For a detailed, step-by-step procedure, refer to the dedicated STEP-BY-STEP section.
Step 1: Power down and unplug the device
Always begin by turning off your phone and unplugging the charging cable or any accessories. This reduces the risk of short circuits if you accidentally touch conductive material inside the port. If moisture is suspected, wait to dry or power down again after inspecting. This is a safety-critical first step that protects both you and the device.
Step 2: Inspect the port under bright light
Use a flashlight to examine the port for visible debris, fiber buildup, or signs of moisture. Look for anything lodged between the contacts or visible on the metal edges. If you see corrosion or a wet environment, stop and consider professional cleaning to avoid further damage. A careful inspection helps you decide which cleaning method to use and whether additional tools are warranted.
Step 3: Gently remove visible debris with a non-metal tool
Using a plastic or wooden toothpick, very gently tease out lint and dust. Do not insert deep, and avoid applying force to metal contacts. Work slowly, in small movements, and stop if you feel resistance. The goal is to lift debris up and away so it can be removed without bending or damaging the connector.
Step 4: Clean with airflow or a soft brush
If debris remains, use short bursts of compressed air from a safe distance or a nylon brush to dislodge particles without scratching. Keep the device angled so dislodged debris falls away from the interior. Do not use a liquid cleaner directly inside the port unless you are certain the port is completely dry afterward.
Step 5: Dry the port and re-check
Wipe the exterior and any accessible areas with a microfiber cloth. Allow a brief air-dry period (about 1–2 minutes) to ensure no moisture remains. Gently re-examine the port for lingering debris and moisture. A dry, clean port is essential before testing charging.
Step 6: Reconnect and test charging
Reconnect the charger and attempt a slow charge to verify a stable connection. If charging is inconsistent, disconnect and re-check for hidden debris or moisture. If issues persist, seek professional assistance rather than applying further risky cleaning attempts.
Maintenance tips after cleaning
Keep the port clear by storing your phone away from lint-prone environments and regularly inspecting the port every couple of weeks. Consider a lightweight protective case and avoid placing the phone directly into dusty purses or pockets. A quick monthly check can prevent buildup and extend port life.
Tools & Materials
- Plastic or wooden toothpick(Non-metal; use gentle, short motions to tease debris without contacting contacts)
- Nylon brush with soft bristles(Small head; use to loosen lint without scratching metal)
- Flashlight or phone light(Bright, focused light to inspect the port)
- Microfiber cloth(For gentle drying of the exterior and accessible areas)
- Compressed air (optional)(Use in short bursts from a safe distance)
- Isopropyl alcohol 70% (optional)(Only if you are comfortable; avoid direct liquid application inside the port)
Steps
Estimated time: 5-15 minutes
- 1
Power down and unplug
Turn off the phone and unplug the charging cable. This minimizes the risk of short circuits while you work. Ensure the device is not connected to any power source and avoid pressing the port during cleaning.
Tip: This protective step reduces the chance of electric shock or contact damage. - 2
Inspect the port with good lighting
Use a bright light to look into the port and spot debris, moisture, or corrosion. If you see any moisture or rust, stop and consider professional help. Visual inspection guides your cleaning approach and helps prevent accidental damage.
Tip: A magnifying option can help you see tiny particles you might miss with the naked eye. - 3
Remove visible debris with a non-metal tool
Gently tease out lint or fluff using a plastic or wooden toothpick. Do not insert deep or press hard against contacts. Work in short, careful motions until debris lifts away from the port.
Tip: Never use metal tools; metal can bend or short the internal contacts. - 4
Clean with airflow or a soft brush
If debris persists, use compressed air in short bursts or a soft nylon brush to loosen particles. Keep the device at an angle so debris exits rather than moves deeper into the port.
Tip: Avoid liquids; direct liquid inside the port can cause short-term or long-term damage. - 5
Dry and re-check the port
Wipe the exterior and the port with a microfiber cloth, then allow a brief dry period (about 1–2 minutes). Re-check for any remaining debris or moisture before testing.
Tip: A dry port reduces the risk of reintroducing debris during reassembly. - 6
Test charging and reconnect
Reconnect the charger and test charging. If the connection is unstable, repeat inspection. If charging fails after re-testing, seek professional assistance rather than attempting further risky cleaning.
Tip: If you hear crackling or notice a burning odor, discontinue use immediately.
Got Questions?
Is it safe to clean my phone charging port at home?
Yes, you can safely clean the port at home if you use proper tools and precautions—avoid liquids and metal, and stop if you notice moisture or damage.
Yes, you can clean it at home with the right tools and caution.
What should I avoid when cleaning a port?
Avoid liquids inside the port, metal objects, and applying excessive force that could bend contacts.
Avoid liquids, metal tools, and forcing anything into the port.
Can I use water to clean the port?
Water is not recommended. Use dry methods or ensure any liquid is completely evaporated before attempting to charge again.
Water isn't recommended; dry methods are best unless you’re sure it’s completely dry afterward.
Will cleaning void my warranty?
Cleaning carefully as part of routine maintenance generally doesn’t void warranties. Check your device's terms and contact the manufacturer if in doubt.
Cleaning carefully usually won't void your warranty, but check your terms.
What if cleaning doesn’t fix charging issues?
If cleaning fails to resolve charging problems, there may be hardware faults or moisture remaining. Seek professional repair.
If cleaning doesn’t help, get a professional check.
How often should I clean the port?
Clean only when you notice debris or charging issues. Routine cleaning is unnecessary and could risk damage.
Clean when you see debris or charging problems.
Watch Video
What to Remember
- Power down before cleaning to avoid shorts.
- Use non-metal tools and gentle motions.
- Dry thoroughly and test charging after cleaning.
- If issues persist, seek professional service.
- Regular maintenance prevents future buildup.